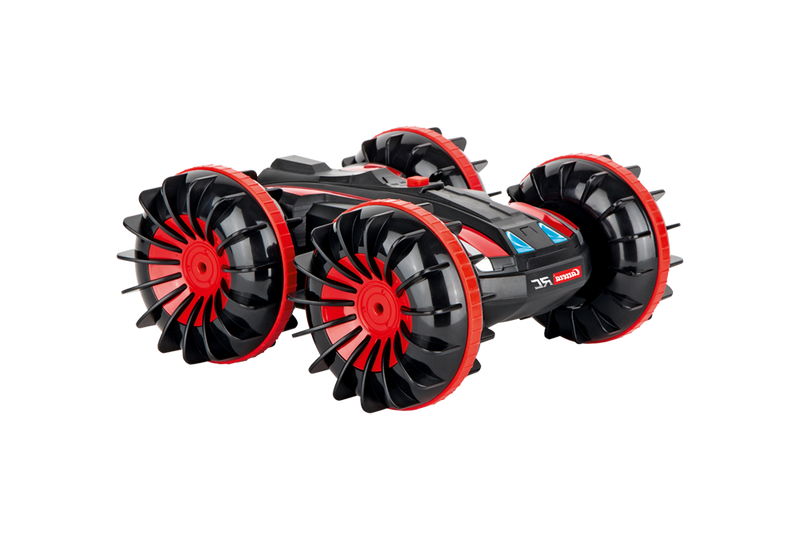
CARRERA RC SEA - fast-paced adventures on the water

Welcome to the dynamic world of remote-controlled <tc>Carrera</tc> RC SEA watercraft! Experience action-packed rides on the lake or in the pool and enjoy driving fun that perfectly combines speed and control. The RC watercraft reach up to 25 km/h and impress with a robust, splash-proof design that ensures reliable action on the water. Thanks to the integrated Security propeller and practical Ready-to-run concept including battery, controller and charger, you can get started right away. Whether you're a beginner or an experienced RC fan - <tc>Carrera</tc> RC SEA offers fast-paced water action for unforgettable summer adventures.

Mehr über RC SEA erfahren

What makes <tc>Carrera</tc> RC SEA watercraft so special?

Action auf dem Wasser für Technik-Fans & Sommer-Abenteurer

Die Carrera RC SEA Wasserfahrzeuge stehen für Fahrspaß auf dem Wasser, der Technik und Action perfekt verbindet. Ob auf dem See oder im Pool – die ferngesteuerten Modelle sorgen für dynamische Fahrten, schnelle Manöver und echtes Racing-Feeling. Wer RC Fahrzeuge sucht, die nicht nur an Land, sondern auch auf dem Wasser begeistern, ist hier genau richtig. So werden Sommertage zu kleinen Abenteuern mit maximaler Kontrolle und jeder Menge Spaß.

Ready-to-Run Technik mit bis zu 25 km/h Geschwindigkeit

Carrera RC SEA Wasserfahrzeuge sind sofort einsatzbereit und liefern rasante Action ohne lange Vorbereitung. Dank Ready-to-Run Konzept sind Controller, Akku und Ladezubehör bereits enthalten – auspacken und loslegen. Mit bis zu 25 km/h entsteht ein sportliches Fahrerlebnis, das Einsteiger und erfahrene RC Fans gleichermaßen überzeugt. Wer sein Setup erweitern möchte, findet passendes Zubehör und Ersatzteile direkt im Carrera Sortiment.

Filter

Filter

Sort by:
Sort by:
Sold out
7,4V 650mAH Akku für Carrera RC Race Boat (301010,301011,301012)
14+ 14+
Art. Nr 370800049 7,4V 650mAH Battery for Carrera RC Race Boat (301010,301011,301012)
Offer price£15.50 GBP
Sold out

Carrera RC SEA: remote-controlled watercraft for fast-paced water action

Ultimate adventures on the water

Ultimate adventures on the water

Get ready for wild adventures on the water with the remote-controlled boats and cool hybrid models from Carrera RC! The watercraft are the perfect choice for water fans and anyone who wants to have an unforgettable time on the lake.


With their powerful motors, safety propellers and robust designs, the boats and watercraft from Carrera RC offer an exciting driving experience. Whether in a hot race or relaxing days on the lake, there's something for everyone with these splashy water artists. What's more, both beginners and experienced boaters will get their money's worth, as the cool means of transportation are easy to control and therefore also suitable for beginners. With the remote-controlled boats, ultimate adventures on the water await, which are the highlight of every summer.


The remote-controlled boats are ready to go straight away - controller, charging cable, rechargeable battery and/or batteries included - unpack and go!

Spritzwassergeschützte Bauweise für zuverlässigen Fahrspaß

Spritzwassergeschützte Bauweise für zuverlässigen Fahrspaß

Damit die Carrera RC SEA Wasserfahrzeuge auch bei intensiver Nutzung überzeugen, setzen sie auf robuste und spritzwassergeschützte Konstruktionen. So bleiben die Modelle stabil und sicher steuerbar, auch wenn es auf dem Wasser mal wilder wird. Die Kombination aus Technik und Widerstandsfähigkeit macht sie zu idealen Begleitern für Outdoor-Abenteuer. Passende Ergänzungen findest du jederzeit bei Zubehör & Ersatzteilen.

Bis zu 25 km/h: Geschwindigkeit, die auf dem Wasser begeistert

Bis zu 25 km/h: Geschwindigkeit, die auf dem Wasser begeistert

Mit bis zu 25 km/h liefern Carrera RC SEA Wasserfahrzeuge sportliche Performance und echtes Action-Feeling. Die kraftvolle Beschleunigung sorgt für Abwechslung, während die Steuerung kontrolliert und präzise bleibt. Dadurch entsteht ein Fahrerlebnis, das sowohl Anfänger als auch erfahrene RC Fans anspricht. Wer noch mehr leistungsstarke Modelle sucht, kann auch einen Blick auf Carrera Expert RC & Carrera Profi RC werfen.

NOT YET DECIDED?

Fast, faster, Carrera. Search for the right remote-controlled vehicle now!

Frequently asked questions

Can't find the right answer in the FAQ or want to find out more about our RC products? Our customer service is on hand to provide you with help and advice - quickly, competently and personally. Whether technical details, spare parts or tips on use: we are here for you.

Support around the clock

Telephone

Monday to Thursday 09:00 to 15:00, Friday 09:00 to 12:00
RC General Vehicles Boats Aircraft

RC General

Both controllers and spare parts for controllers (antennas, joysticks, joystick extensions and battery compartment covers) are available in our online shop .

Please note that the antennas are not included with the controllers. These can be purchased in the online shop .

No, please only use the original Carrera RC Li-Ion batteries. This is the only way to guarantee flawless operation. You can find all batteries and matching chargers in our online shop.

For 2.4 GHz D/P models
Please observe the order of start-up:
1) Switch on the transmitter
2) Then switch on the model
Please keep the reverse order when switching off after the flight.


For 27 MHz models
Please check whether the transmitter antenna is faulty or possibly not fully extended. If there is another RC model nearby, make sure that the same frequency is not being used. In this case, please change the frequency.

Vehicles

Check that the antenna is screwed into the controller as far as it will go. Then pull out the antenna completely. Use the transparent antenna tube included in the packaging for the antenna on the vehicle (depending on the model).

Open the vehicle chassis and clean the axles to remove dust and hair. Also apply a drop of oil (resin- and acid-free grease) to the axles.

If, when operating the Carrera RC 2.4 GHz DIGITAL-PROPORTIONAL vehicle, it turns out that the car is moving forwards or backwards on its own, it can be brought to a standstill as follows:
1) Turn the vehicle around so that the wheels are in the air.
2) First switch the vehicle on using the ON/OFF switch. The LED on the top of the vehicle flashes rhythmically. Switch on the controller. The LED on the controller flashes rhythmically. After a few seconds, the LEDs on the vehicle and the controller light up permanently. The binding is now complete.
3) Press the button on the top right-hand side of the controller for approx. two seconds. The adjustment mode is active as soon as the controller LED flashes. (See picture)
4) The forward or reverse movement can be brought to a standstill with the left joystick.
5) To complete the adjustment process, press the button on the top right-hand side of the controller again for approx. two seconds - the LED now lights up permanently.

Proceed as follows if your 2.4 GHz DIGITAL-PROPORTIONAL model pulls to the right or left:
1) Turn the vehicle over so that the wheels are in the air.
2) First switch the vehicle on using the ON/OFF switch. The LED on the top of the vehicle flashes rhythmically. Then switch on the controller. The LED on the controller flashes rhythmically. After a few seconds, the LEDs on the vehicle and the controller light up permanently. The binding is complete.
3) Press the button on the top right-hand side of the controller for approx. 2 seconds. The adjustment mode is active as soon as the controller LED flashes. (See picture)
4) The straight-ahead driving can be adjusted with the right-hand joystick.
5) To complete the adjustment process, press the button on the top right-hand side of the controller again for approx. two seconds - the LED then lights up permanently.

Yes, it is recommended to clean the Carrera RC vehicle after the ride to ensure smooth operation. Please ensure that you do not use any harsh solvents.

For 2.4 GHz Digital Proportional models:
The Carrera RC vehicle and the controller are bound at the factory. If there are problems with the communication between the Carrera RC vehicle and the controller at the beginning, please perform a new binding. Press the bind button on the underside of the chassis to rebind the Carrera RC vehicle and the controller. The bind button must be pressed for at least 3 seconds. Please note that both the controller and the Carrera RC vehicle must be switched on at the ON/OFF switch.
For 27 MHz models:
Make sure that nobody in your driving area is using the same frequency. To avoid this and so that the Carrera RC vehicle can be addressed by the controller, make sure that the same frequency (A/B/C) is set on the vehicle and on the controller. The vehicle's frequency switch is located in the battery compartment, the frequency switch on the controller is located on the top of the controller. Using different channels makes it possible to drive 3 vehicles at the same time.
The controller antenna should be pulled out completely. Then switch on the Carrera RC vehicle at the ON/OFF switch. The Carrera RC vehicle has two speeds: The ON/OFF switch can also be used to switch to training or indoor mode.
For 2.4 GHz Servo Tronic models:
First switch on the vehicle, then the LED on the top of the vehicle flashes rhythmically. You can then switch on the controller. Here too, the LED flashes rhythmically for a few seconds. As soon as the vehicle and the controller are bound, the status LEDs on the vehicle and controller light up permanently.
Adjusting the steering: If, when operating the Carrera RC vehicle, it turns out that the vehicle is pulling to the right or left, the lane can be corrected using the adjustment switch on the underside of the vehicle.

Proceed as follows to correctly bind your Red Fibre® Carrera® Profi® (370183002/370183001) vehicles to the controller:
1) First switch on the vehicle
2) Then switch on the controller. When the LEDs on the vehicle and the controller light up constantly, the binding process is complete.

You can find all spare parts and accessories for the various professional RC models in our online store by entering the item number or name of your model in the search field. All suitable spare parts are displayed on the item detail page of the vehicle.

The individual parts can be identified quickly and easily with the help of the exploded view, whereby the exploded view is only available for professional models.

To put your Carrera Profi RC vehicle into operation, first switch the vehicle on using the ON/OFF switch. The LED on the vehicle flashes rhythmically. Then switch on the controller. After a few seconds, the LEDs on the vehicle and the controller light up permanently. Binding is complete.
The ON/OFF switch is located on the left-hand side of the vehicle, directly next to the battery compartment.

The correct frequency is printed on a sticker on the back of the controller and on the vehicle in the area of the drive axle.

Boats

Let the water drip off and dry your boat thoroughly after use. Use normal tap water to clean your boat. The contacts of the water sensors should be treated regularly with vinegar cleaner to prevent corrosion. Make sure that the vinegar cleaner does not come into contact with the propeller and rudder. This could lead to permanent damage.

How to drain your boat correctly:

Coast guard boat Falshöft (301001/301005)

Please open the two drain plugs at the bow and stern after every trip and drain any condensation water that has formed. Please make sure that you put the drain plugs back into the openings provided before each trip.

Ferrari boat Arno XI (300005)

There is a drain plug at the stern. Open this after every trip to drain the condensation water. Please make sure that you put the drain plug back into the opening provided before each trip.

Power Wave (300001)

You will find the drain button on the underside of the boat between the propeller and the sensor. Press it in with a blunt object until the condensation has drained out of the boat. As the drain button is spring-loaded, it will automatically return to its original position as soon as you stop pressing it in.

Please note that binding is only possible in the water for safety reasons. When starting up, first switch on the controller and then the boat. After the trip, follow the reverse order - switch off the boat first and then the controller.

Our boats are suitable for operation in normal to moderate waves in fresh water.
Should your boat nevertheless come into contact with dirty or salty water, it must then be thoroughly cleaned with normal tap water.

If the battery of your boat or vehicle has been connected correctly and the charging process is proceeding normally, the red LED will light up constantly. When the battery is fully charged, the red LED light switches to green. The battery can be removed and installed in the vehicle or boat.

Aircraft

If your Micro Quadrocopter (502002) does not take off despite a fully charged battery, please check whether the arrangement of the 4 rotor blades is correct. The letters are stamped on the top of the rotor blade. It is important to position the A/D rotor blades and the B/C rotor blades correctly.

Before your first flight, please check whether there is a statutory insurance requirement for model aircraft in your country. You can obtain further information from the German Model Flying Association. You are not allowed to do the following with your model aircraft:

  • Fly near airfields (minimum distance 1.5 km)
  • Fly over crowds of people, military objects, hospitals, power stations or prisons without a permit- Please ensure that you always maintain direct visual contact with the aircraft.
  • Flying in windy and bad weather conditions and under the influence of drugs and alcohol is prohibited.

Please observe the following sequence to bind the controller to your helicopter correctly:
1. Switch on the helicopter.
2. Switch on the controller.
Exception: For the Sky Hunter (501001) and Red Eagle (501002), please observe this sequence:
1. Switch on the helicopter
2. Press the right control stick on the controller and then switch it on.

Affects the following helicopters:
Thunder Storm (501004)
Helicopter (501007)
Green Chopper (501003)
Orange Sply (501005)
Green Vecto (501008)
Red Buzzer (500001)
Micro Helicopter (502001)
The correct trim is the basic requirement for stable flight behavior of the helicopter. The tuning requires some patience and feeling.

Please observe the following instructions:
Carefully move the throttle lever on the controller upwards and allow the helicopter to climb approximately 0.3 to 0.8 meters in altitude.

If the helicopter turns to the left or right on the spot while hovering without moving the lever for tail (circular rotation), please proceed as follows: If the helicopter rotates quickly or slowly around its own axis to the left by itself, press the lower right trimmer for tail (circular rotation) on the controller gradually to the right. If the helicopter turns to the right, press the tail trimmer (circular rotation) gradually to the left.

If the helicopter hovers without moving the forward/backward lever forward or backward, please proceed as follows: If the helicopter moves forward quickly or slowly on its own, press the upper right trimmer for forward/backward on the controller gradually downwards. If the helicopter moves backwards, press the trimmer for forwards/backwards upwards step by step.

Applies to the following helicopters:
Sky Hunter (501001)
Spider Fox (501006)
The correct trim is the basic requirement for stable flight behavior of the helicopter. The tuning requires some patience and feeling.

Please observe the following instructions:
Carefully move the throttle stick on the controller upwards and allow the helicopter to climb approximately 0.3 to 0.8 meters in altitude.

If the helicopter is hovering without moving the right/left tilt lever to the left or right, please proceed as follows: If the helicopter moves quickly or slowly sideways to the left on its own, press the lower right trimmer for right/left tilt on the controller gradually to the right. If the helicopter moves to the right, press the right/left tilt trimmer gradually to the left.

If the helicopter turns to the left or right on the spot while hovering without moving the lever for tail (circular rotation), please proceed as follows: If the helicopter rotates quickly or slowly around its own axis to the left by itself, press the lower left trimmer for tail (circular rotation) on the controller gradually to the right. If the helicopter turns to the right, press the tail trimmer (circular rotation) gradually to the left.

If the helicopter is hovering without moving the forward/backward lever forward or backward, please proceed as follows: If the helicopter moves forward quickly or slowly on its own, press the upper right trimmer for forward/backward on the controller gradually downwards. If the helicopter moves backwards, press the trimmer for forwards/backwards upwards step by step.

Sign up for the newsletter now & get a €10.00 voucher!